Enterprise
September 12, 2025 · Last updated on September 16, 2025
Super Admin setup checklist for HeyGen Enterprise
# Account Management and Setup
# Getting Started
# Super Admin
Get your HeyGen Workspace up and running

If you’ve been assigned the Super Admin role on your company’s HeyGen Enterprise account, this guide is your go-to checklist for setting everything up with confidence.
From configuring your shared workspace and inviting teammates to enabling secure login with SAML SSO, we’ll walk you through each essential step to get your team onboarded and collaborating efficiently.
What’s covered in this guide:
- Getting Started panel
- Setting up your Workspaces
- Inviting teammates
- Organizing your workspace using sub-workspaces for teams or clients
- Managing access levels for content, folders, and videos
- Configuring security settings
- SCIM provisioning and audit logs
- Recap
Ready to go? Let’s get started.
Getting Started panel
When you log into your HeyGen account, you’ll see a Getting Started panel on the left side of your dashboard. As an Enterprise Super Admin, this includes a simple three-step onboarding module:
- Set up your Workspace
- Invite members
- Configure security settings
As you complete each step, it will automatically be checked off. You can revisit this panel anytime until all steps are complete.
Setting up your Workspace
From your HeyGen homepage, click your name in the bottom-left corner. Under “Personal,” you’ll see your individual account, and under “Workspace,” you’ll see all HeyGen workspaces you’ve joined or been invited to.
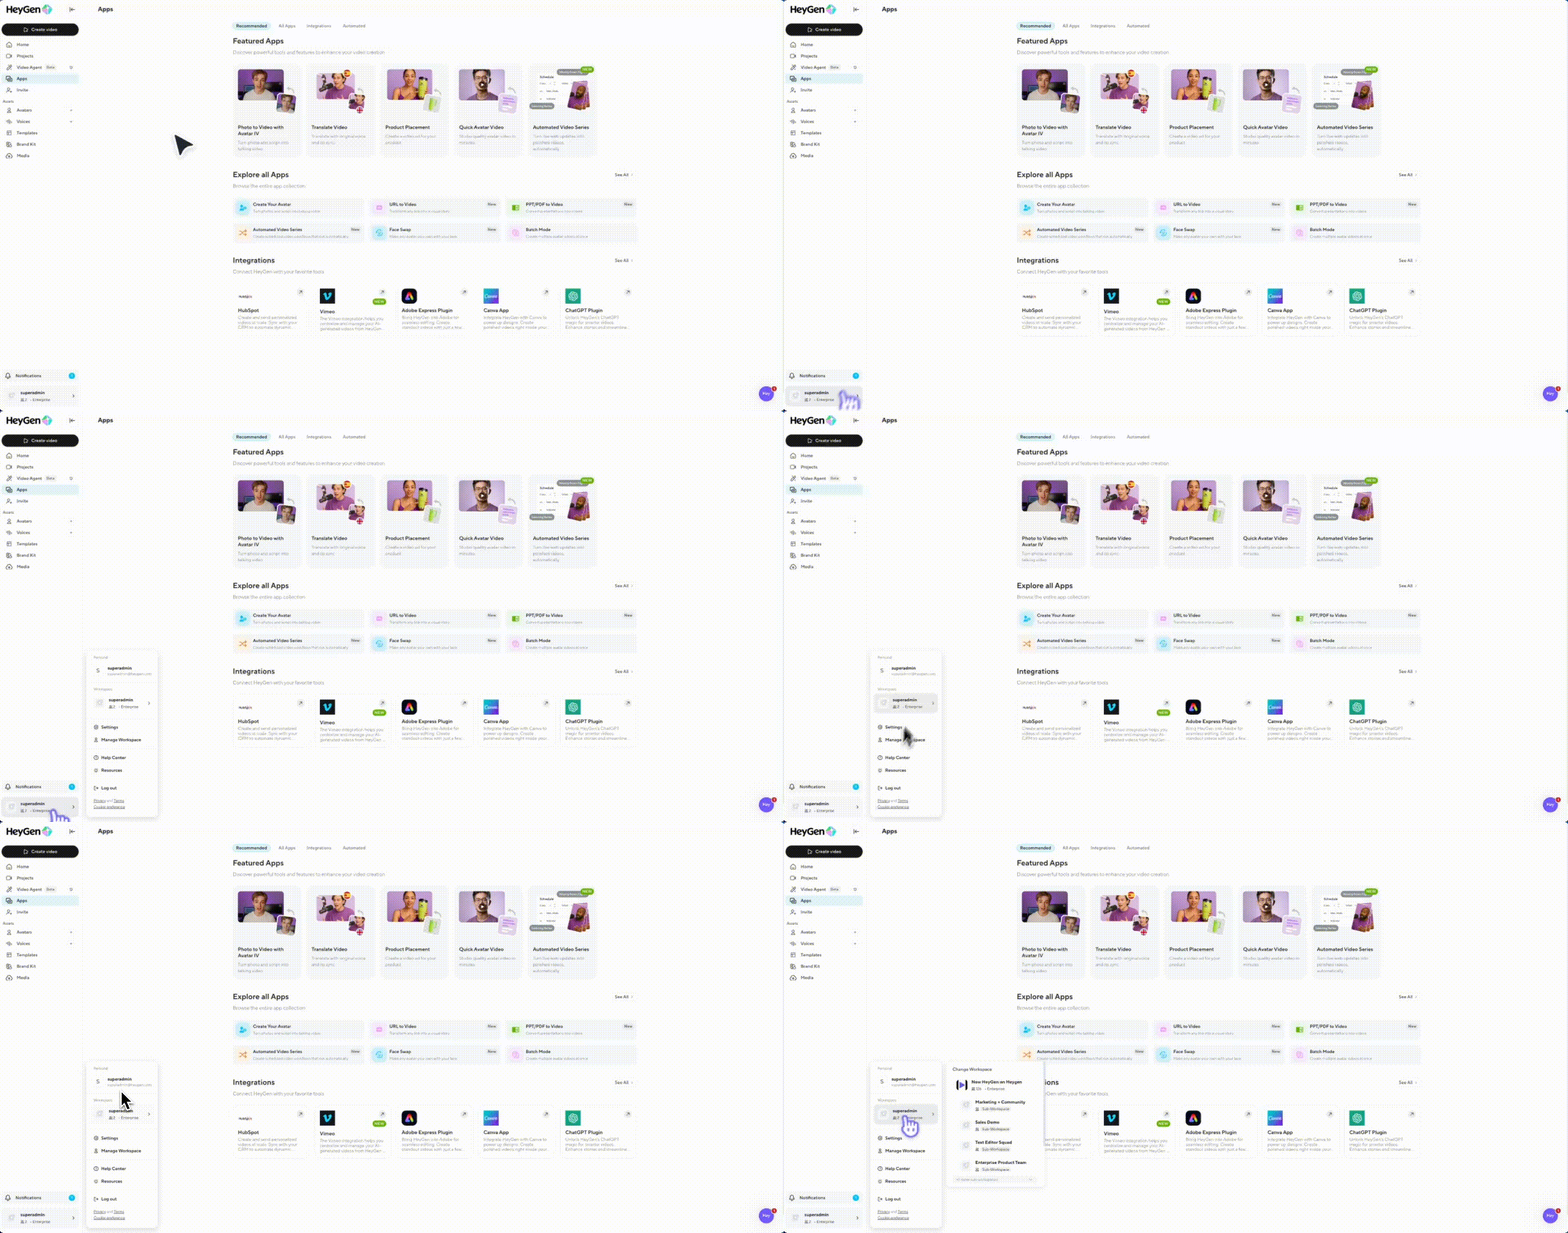
When you first create your account, you may be on a Free plan. But once you join your Enterprise workspace, the word “Enterprise” will appear in the bottom-left corner, unlocking enterprise features and security controls.
Create a New Workspace
To create a new workspace, go to Settings from the bottom-left corner and go to the General tab.
Here, you can set your workspace name, add a description, upload a logo, and configure who can join your workspace. You’ll have three options:
- Invite-only
- Anyone with an @{domain} email can request to join (this is the default setting)
- Anyone with an @{domain} email can join automatically
If you leave the default setting, users who sign up with your domain will see your workspace listed. When they click Request to Join, they’ll skip the paywall, go through onboarding, and land in their personal free space. Your workspace will only appear after you approve their request.
If you choose the auto-join option, users with your domain will be added immediately, no approval needed. They’ll complete onboarding and land directly inside your shared workspace. On Team plans, this consumes a seat immediately. Enterprise plans with unlimited seats are not affected.
Inviting Teammates
Ready to invite your teammates? First, make sure you’re viewing from your new workspace by checking the left navigation pane. You should see your workspace and the word ‘Enterprise.’
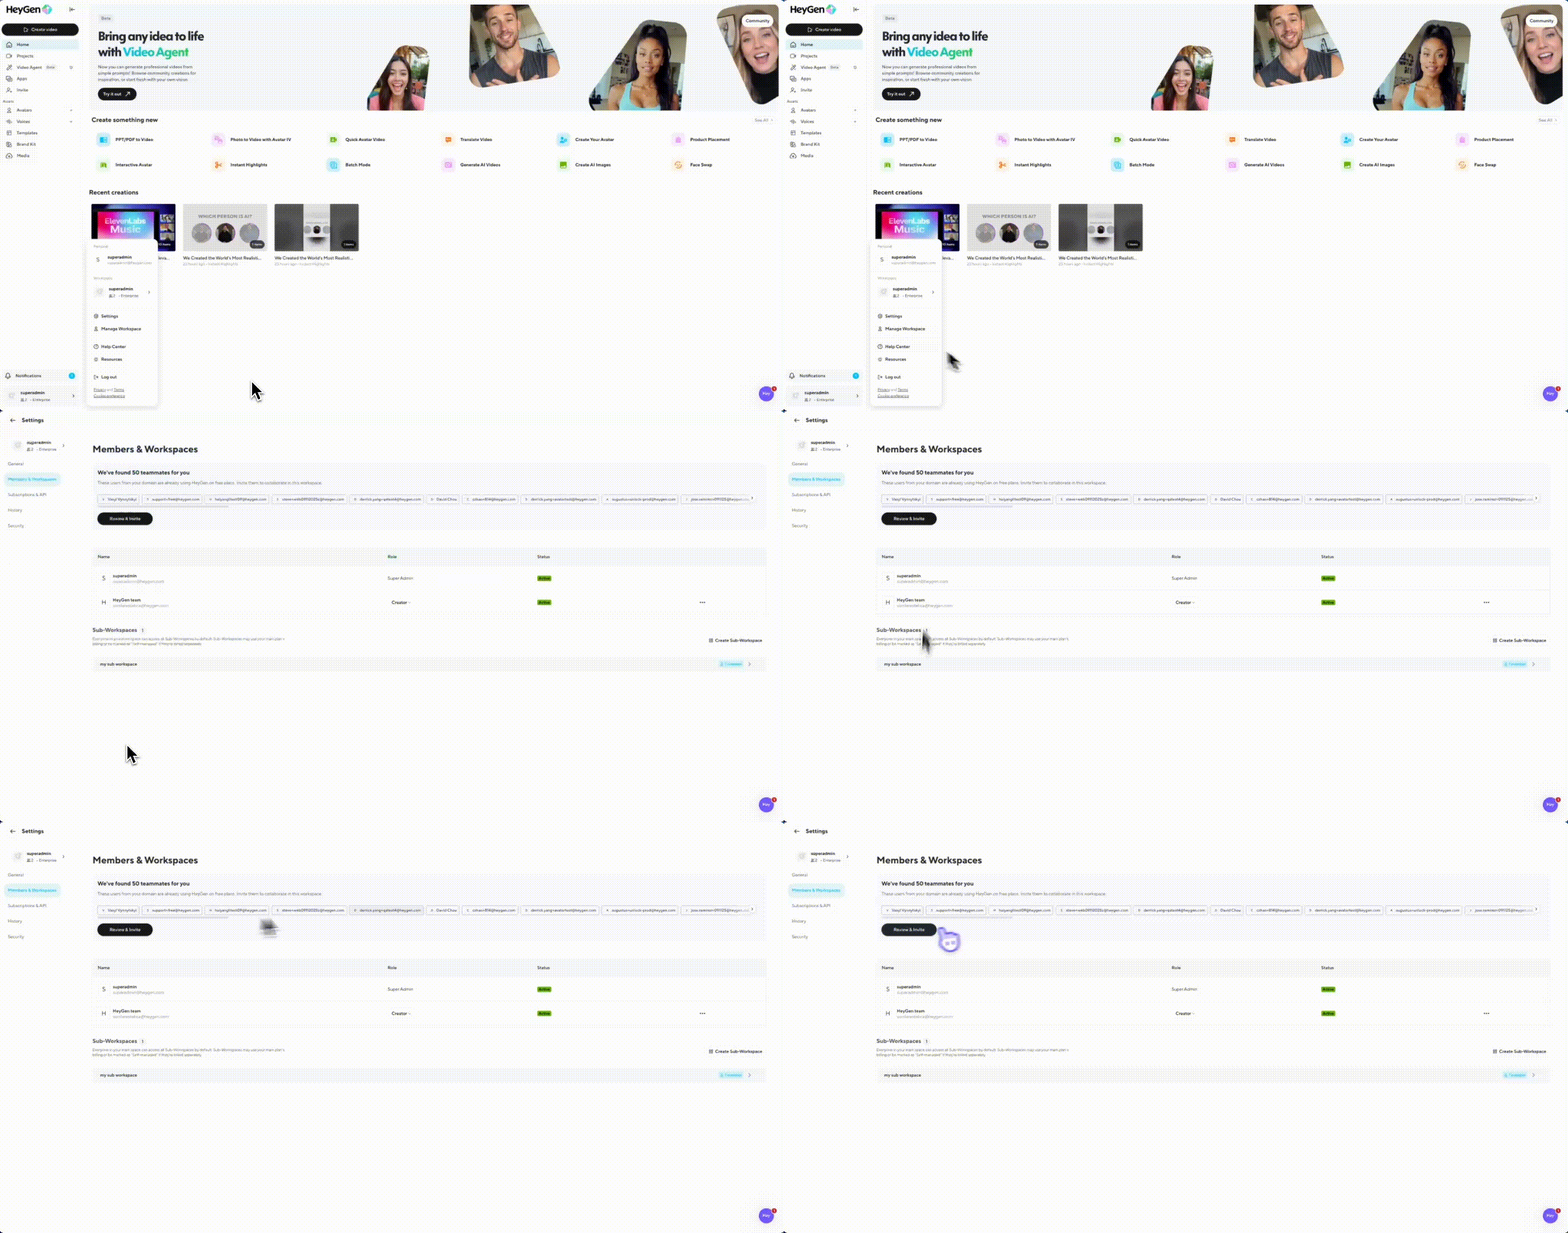
Click your workspace and then select Manage Workspaces. Here, you’ll see a list of all users you’ve invited to your space, their role, and their status.
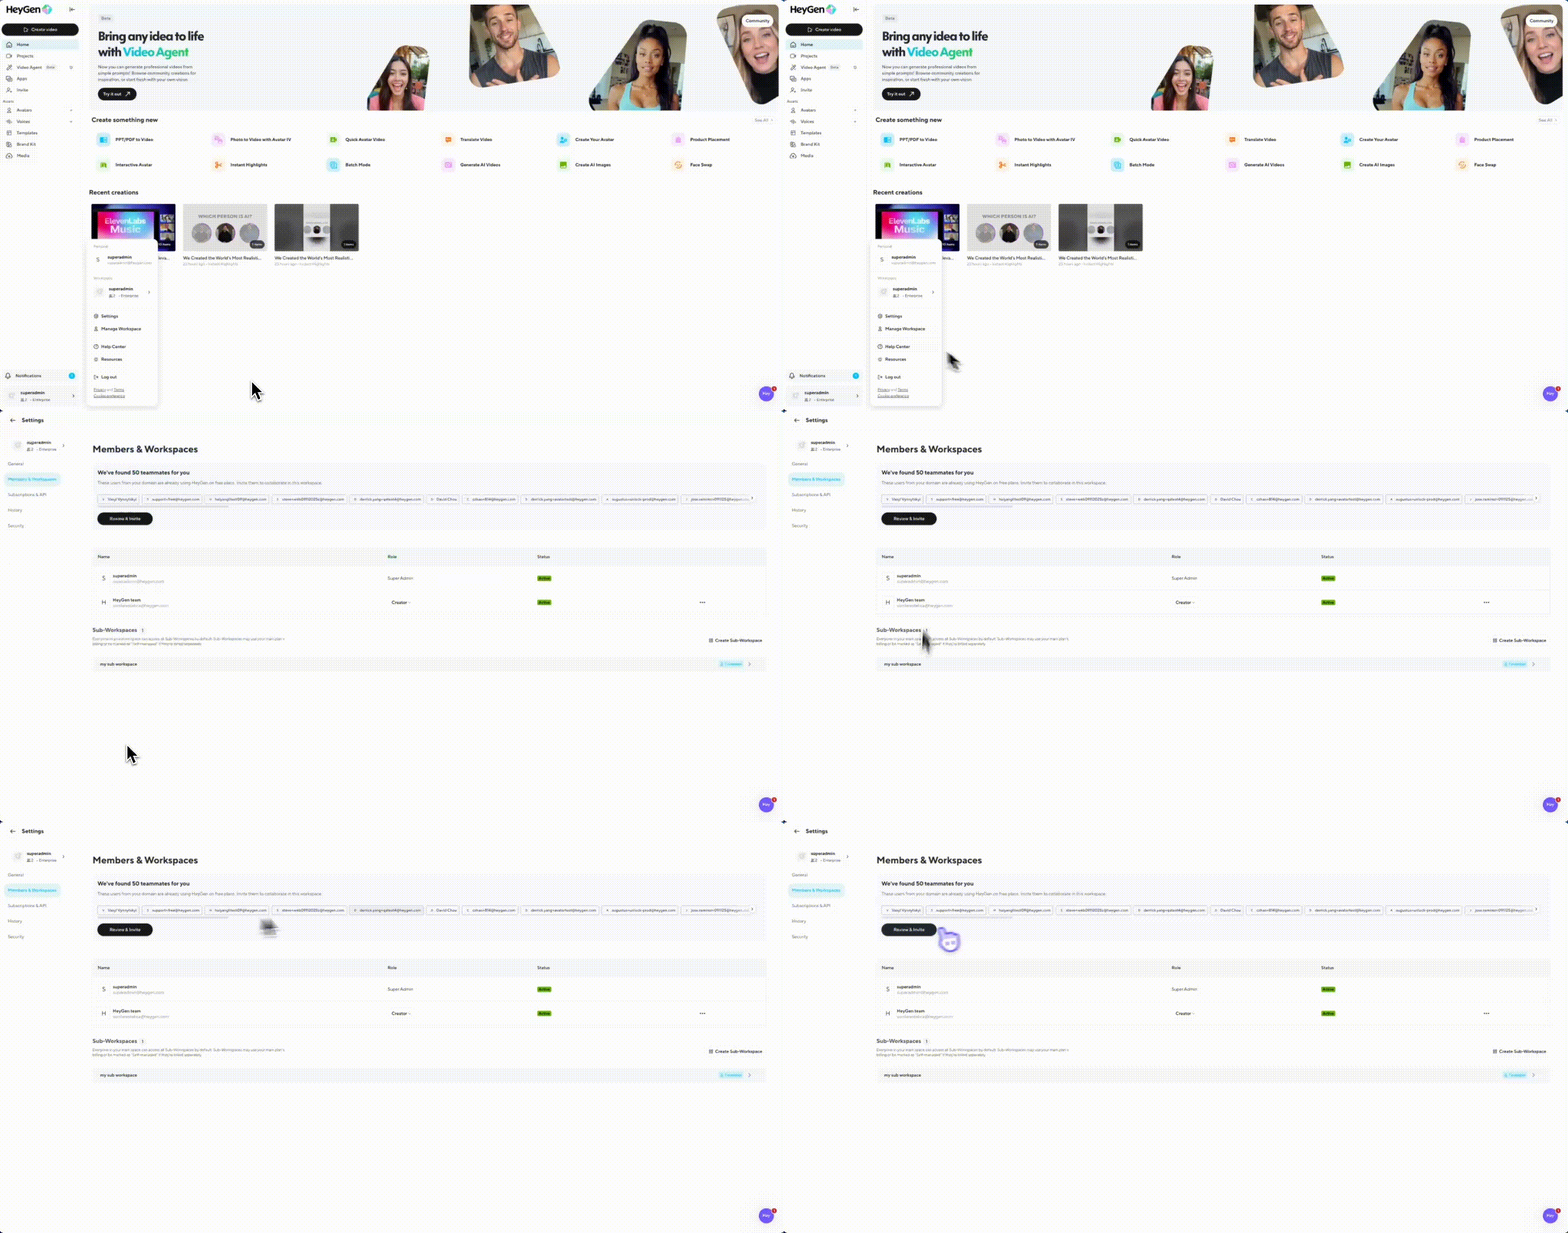
This tab also surfaces suggested teammates already using a HeyGen account with your company domain.
You can invite new users by email, which will send them an email prompting them to sign in, or by copying this invite link.
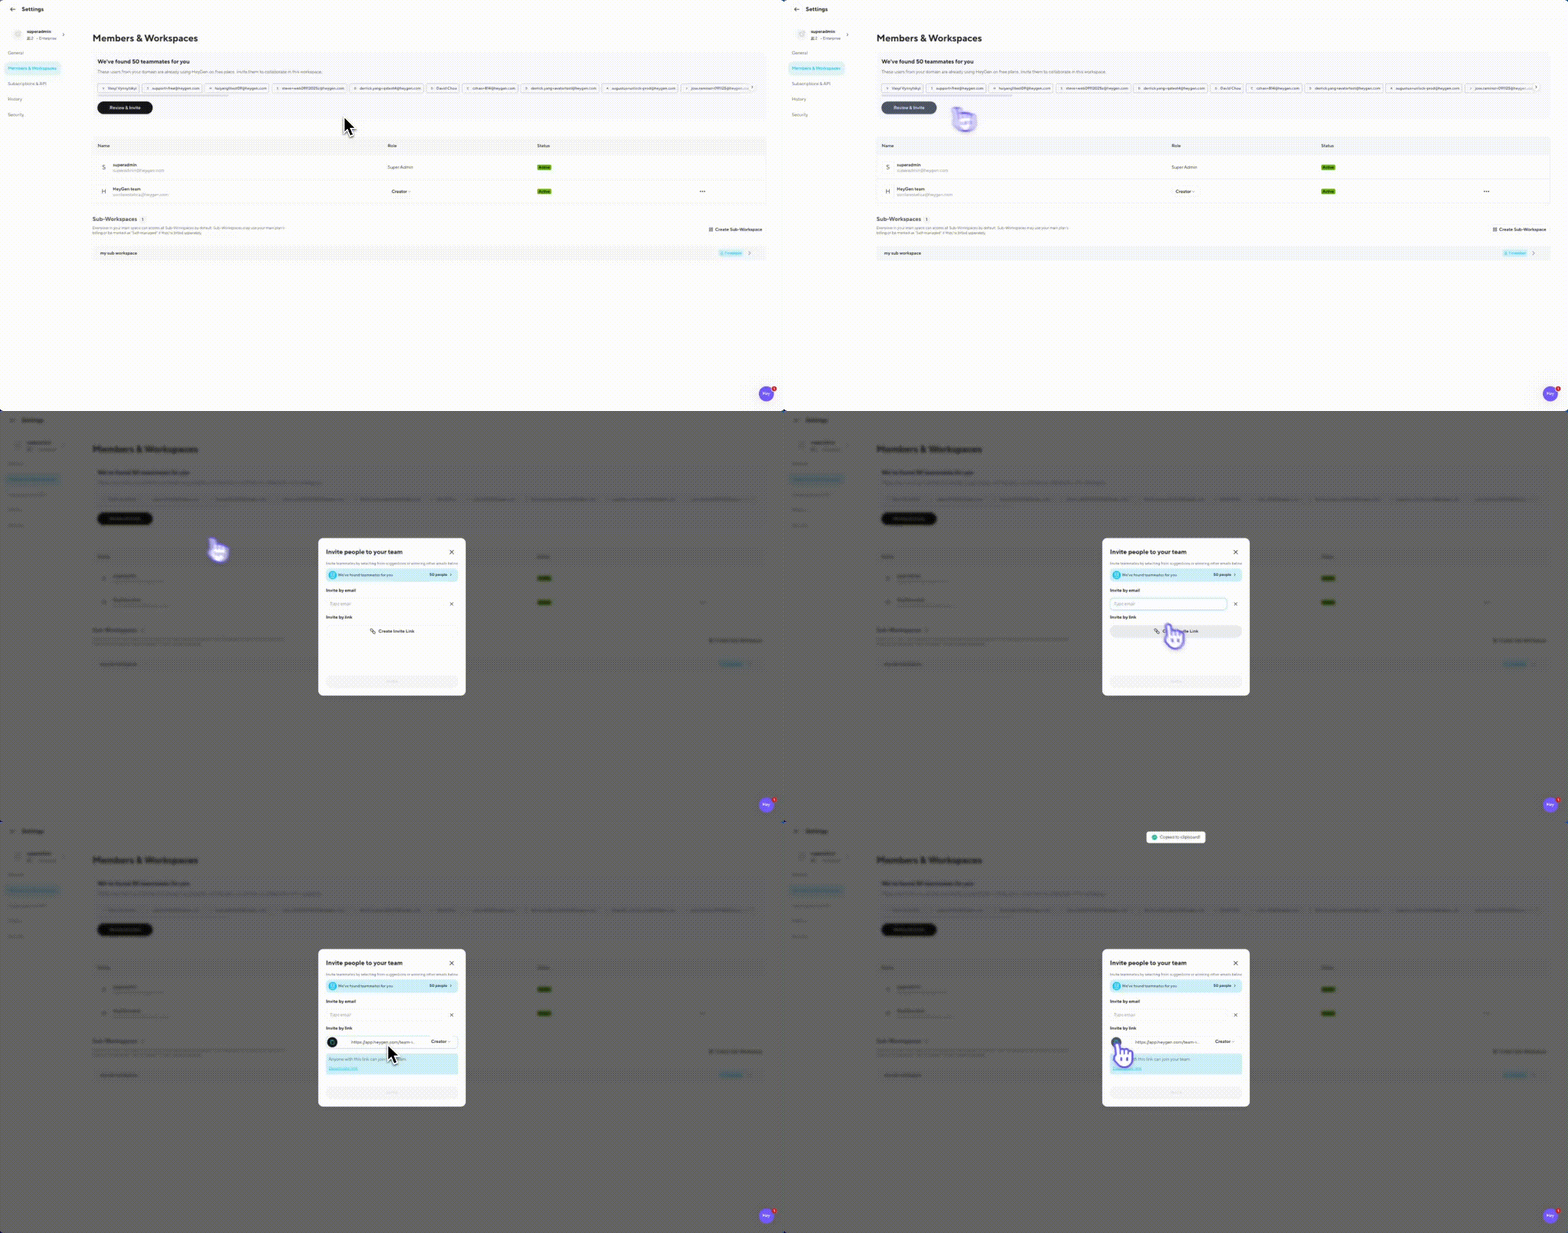
Once you’ve invited a new user, you’ll notice their email show up in your workspace list with the status “Invite Sent.” Once they sign into their HeyGen account, accept the invite, and join the space, their status will be updated to “Active.”
How to approve or deny requests
If your workspace is set to “Anyone with an @{domain} email can request to join,” you’ll receive join requests in two places:
- The Notifications panel
- The Members & Workspaces tab
From either place, you can accept or deny individual requests. If you have multiple pending users, the Members tab gives you bulk controls: Accept All or Reject All.
As soon as you approve a request, the user becomes an active member and is assigned a seat (if you’re on a Team plan). On Enterprise Unlimited, no charge is applied.
Note: If your workspace is set to auto-join, this approval step is skipped entirely—users join instantly and show up as active members right away.
Roles
Let’s go over roles. Every user added to your workspace has one of four roles:
- Super Admins can manage all settings, permissions, billing, domain registration, and SAML/SSO setup.
- Developers can create content and access API integrations.
- Creators can produce videos, avatars, and voices.
- Viewers can view shared content but cannot make changes.
Role | Best For | Access / Permissions | Purchases / Upgrades | API Access | Edit Content | See Content |
|---|---|---|---|---|---|---|
Super Admin | Plan administrators | ✅ | ✅ | ✅ | ✅ | ✅ |
Developers | System admins, developers | ✅ | | ✅ | ✅ | ✅ |
Creators | Video production team, content creators | ✅ | | | ✅ | ✅ |
Viewers | Reviewers and approvers | | | | | ✅ |
Managing Sub-workspaces
Head over to your Workspaces. From here, you'll see the option to create a new subworkspace under your main Enterprise workspace. Enter a name, add a logo (optional), and assign the first members.
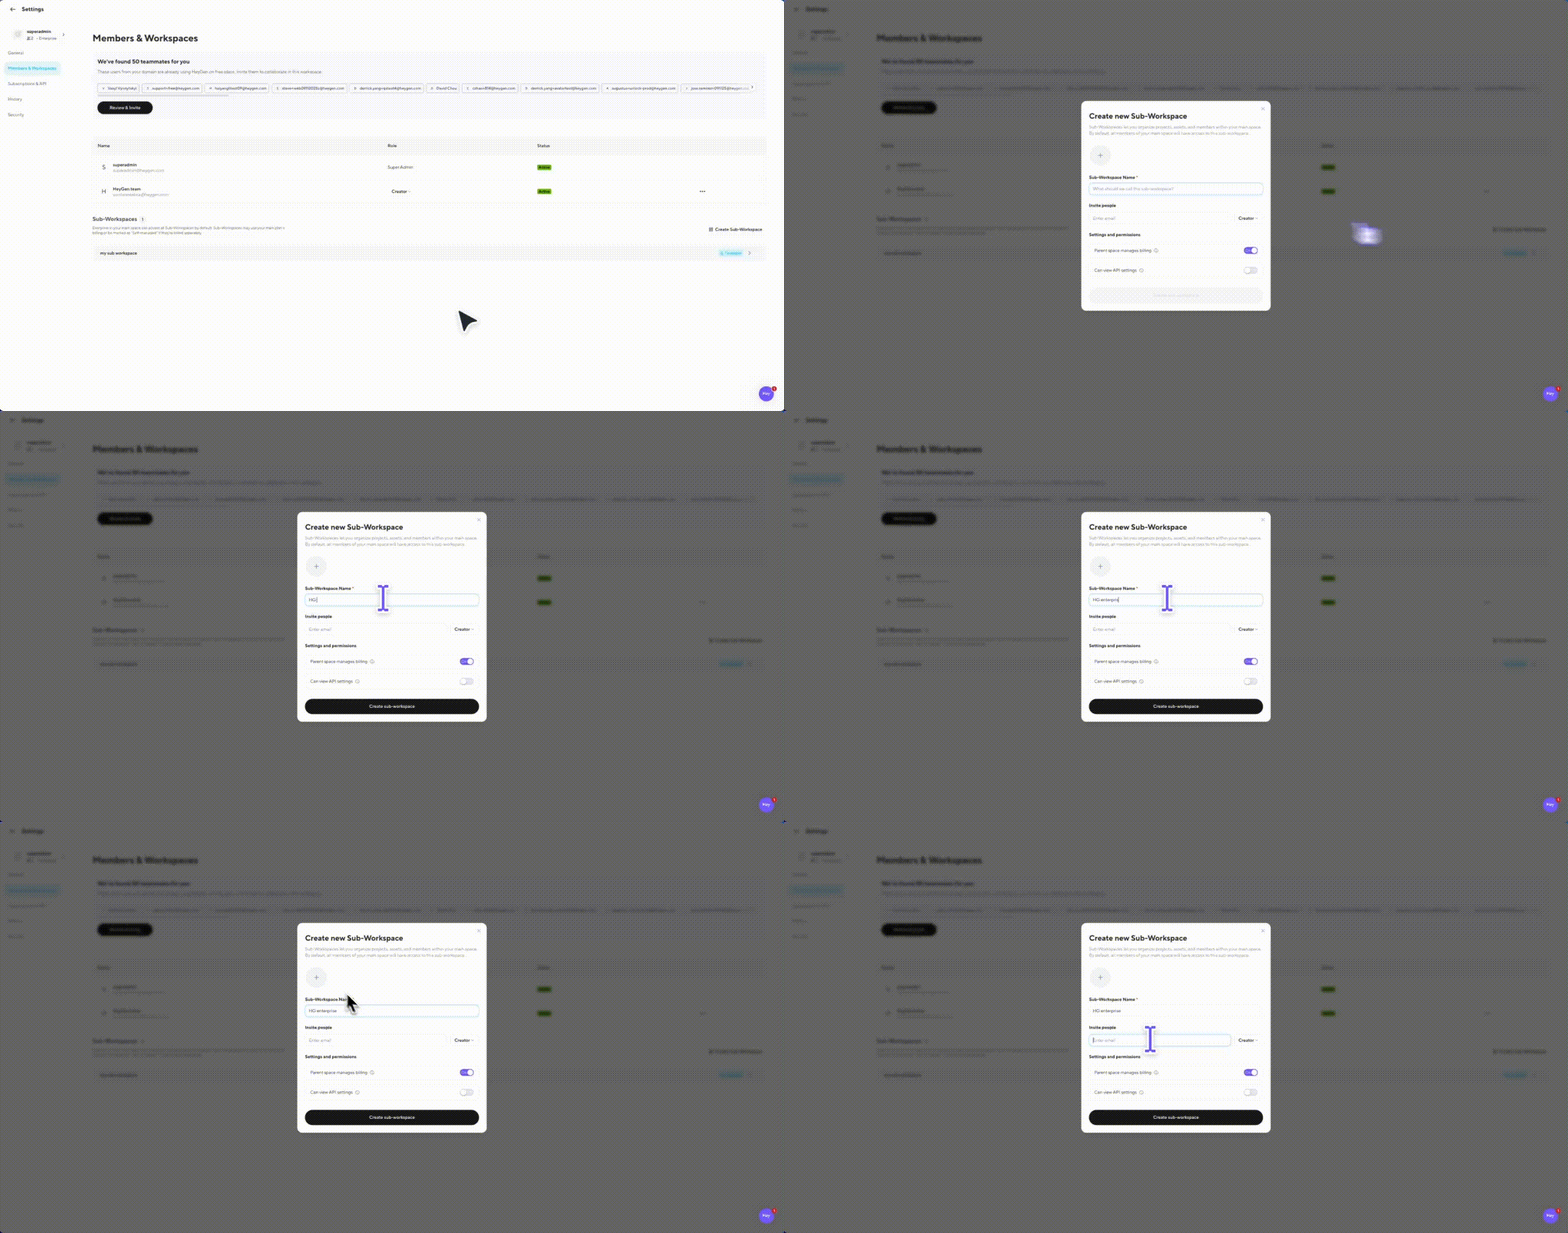
You can also choose whether you want the parent space to manage billing, or set the subworkspace to be self-managed. A self-managed subworkspace is responsible for handling its own billing directly—including payments, settings, and API keys.
Once created, it will appear in your workspace list.
With this feature, each client, department, or project gets a dedicated environment—keeping assets, members, and settings separate for clarity and easier management. Teams only see what's in their own subworkspace.
Meanwhile, parent account members not only have complete visibility across the entire organization, but are also, by default, members within every subworkspace under that parent workspace. Each subworkspace has its own membership and permissions, allowing teams to be self-sufficient.
The main account provides top-down administration with access to all groups, while users within a subworkspace remain limited to their own content. HeyGen recommends using the main account primarily for administrative functions, while content creation happens at the individual team level.
Subworkspaces can also inherit shared assets and resources from the main account. For example, brand managers can set up brand kits and glossaries that follow style guidelines and distribute them across all teams. Similarly, main account admins can allocate credits to specific subworkspaces to ensure premium add-ons are available where they’re needed most.
Access controls
Beyond team roles, you can also control how your team accesses content within the shared workspace.
To share access to a project, video, or folder, click the three dots and select Share. You can grant view-only or editing permissions to specific users, or make it accessible to anyone in the workspace.
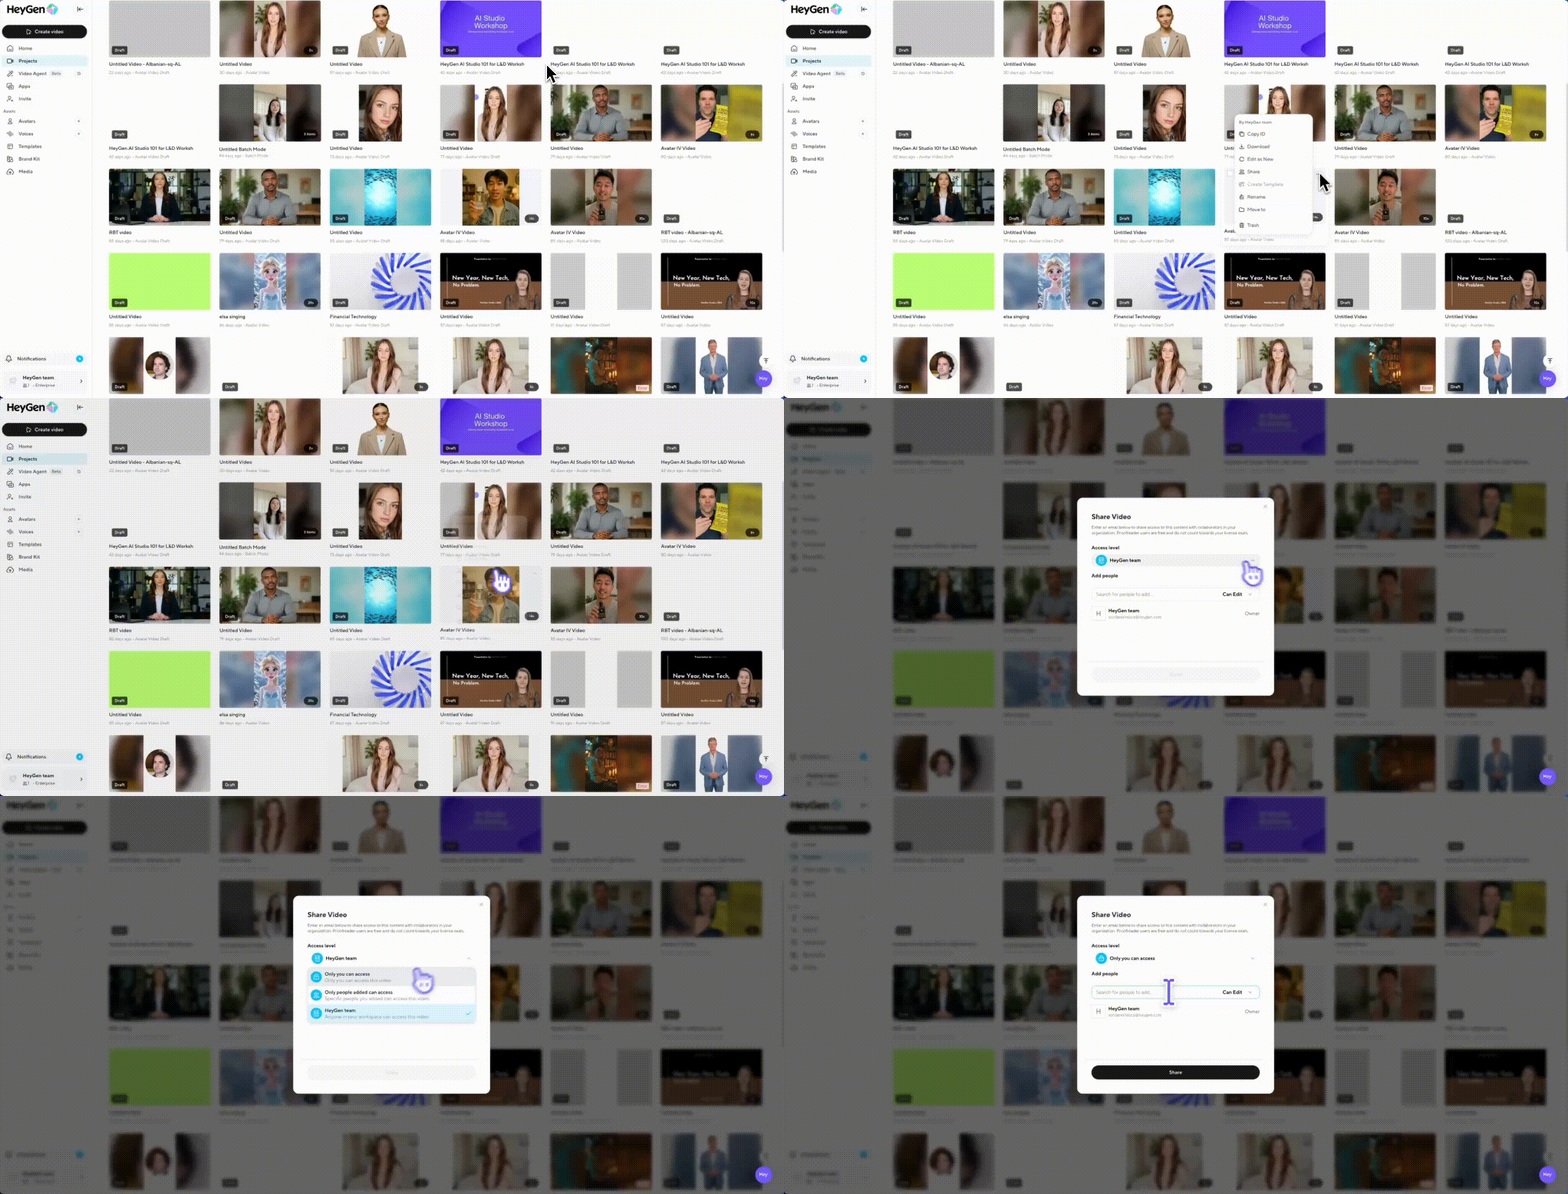
Viewers will still only be able to view, even if a higher access level is set.
Share Page
Once someone creates a video, they’ll land on the Share Page. From here, they can:
- Configure general access and permissions
- Password protect the video
- Add/edit captions

You can also publish the video to the web so anyone can view a read-only version, no sign-in required.
SAML Single Sign-On (SSO)
Next up, let’s cover how to set up SAML Single Sign-On (SSO) with your identity provider, register your company domain for just-in-time provisioning, and manage access controls.
SAML SSO allows your team to log in securely using your company credentials and centralize authentication. This is a core enterprise feature, ensuring smoother onboarding, enterprise-grade security, and compliance with standards like SOC 2 Type 2.
Before you get started, make sure you’re connected with your HeyGen Account Executive. They can help coordinate onboarding, domain registration, and provisioning.
Domain Registration for SAML
As an Enterprise Super Admin, you can register your company’s domain to your workspace. This step is required for enabling just-in-time provisioning with SAML SSO.
Currently, this is a manual process: simply provide HeyGen with the list of domains your organization owns. Once registered, these domains allow:
- Automatic Discovery – users signing up with your email domain will see your enterprise workspace.
- Just-in-Time Provisioning – when combined with SAML SSO, new accounts can be automatically created upon login.
Setting up SAML SSO with Microsoft Entra ID
Now, let’s walk through setting up SAML SSO with Microsoft Entra ID (formerly Azure AD).
Start by opening Azure Active Directory in your Azure portal. From here, click Enterprise Applications, then All Applications.
Next, click New Application at the top and select Create your own application. Name the app “HeyGen” and click Create.
Once your app is created, go to Single Sign-On and choose the SAML option. From here, click Edit and enter the following details:
- Identifier (Entity ID): https://api2.heygen.com
- Reply URL: You’ll find this in your HeyGen Admin Panel.
After entering these values, go ahead and click Save.
Keep in mind that your application must pass user identity to HeyGen in the form of an email address. This means your NameID claim should be in email format. Be sure to also add user attributes for firstName and lastName.
Once your app is set up, you’ll need to assign users who should have access to HeyGen.
To do this, click Assign users and groups. Then click Add user/group, select the users you’d like to include, and click Assign.
Now, let’s grab the setup information you’ll need to complete configuration in HeyGen.
On the Single Sign-On page in Azure, download the metadata file, which contains your certificate and URLs. From here, you’ll copy three key parameters:
- Entity ID
- SSO URL§
- Certificate
With those three parameters in hand, return to your HeyGen SSO settings page.
Paste the values into the appropriate fields and click Save.
Finally, it’s time to test your configuration.
Head to the HeyGen login page and select Sign in with SSO. Log in using your company credentials, and if everything has been set up correctly, you’ll land right inside HeyGen with SSO enabled.
Setting up SAML SSO with Okta
Now, let’s walk through how to set up SAML SSO with Okta.
Start by logging into your Okta account and clicking Admin in the upper right corner. From here, go to Applications and select Create App Integration. When prompted, choose SAML 2.0 as your integration type.
Next, name the app “HeyGen” and click Next. On the setup screen, you’ll need to input the following details:
- Single Sign-On URL (ACS URL): https://api2.heygen.com
- Entity ID: You’ll find this value in your HeyGen Admin Panel.
Make sure your application passes the user identity to HeyGen in the form of an email address. This means the NameID claim should be in email format. You’ll also want to configure user attributes for firstName and lastName.
Once that’s complete, scroll down and click Next. On the final page, select I’m an Okta customer adding an internal app and This is an internal app that we have created, then click Finish.
With the app created, the next step is assigning users. From the Applications page, click the Assignments tab, then click Assign to select the teammates who should have access to HeyGen.
After assigning users, it’s time to grab the configuration details needed to connect Okta with HeyGen. Still on the Applications page, click the Sign On tab and scroll down to View SAML setup instructions. Here you’ll see three key parameters: the Entity ID, the SSO URL, and the Certificate.
Once you have these values, open your HeyGen SSO settings page. Paste the three parameters into the appropriate fields and click Save.
Finally, it’s time to test the login. Head to HeyGen’s login page and select Sign in with SSO. Enter your company credentials, and if everything has been configured correctly, you’ll be logged into HeyGen using Okta SSO.
By enabling SAML SSO, you’re also unlocking HeyGen’s enterprise security toolkit:
- SCIM provisioning for automated user lifecycle management.
- Centrally managed roles and permissions.
- Audit logs for compliance.
- Enterprise-grade security with SOC 2 compliance.
Recap
As a HeyGen Super Admin, you have all the tools to:
- Launch and configure your workspace
- Invite teammates and manage role-based access
- Organize your company with subworkspaces
- Set granular permissions for content sharing
- Secure your workspace with SAML SSO and enterprise controls
We can’t wait to see what you and your team will create with HeyGen, now it’s time to bring everyone in and start creating together!
1
Comments (0)
Popular
Table Of Contents

