

Avatars
May 1, 2025 · Last updated on March 3, 2026
Introducing Avatar IV: Create talking Avatars from a single photo

# Avatar
# Avatar IV
Bring Any Face to Life with AI: Instantly Generate Photorealistic Talking Avatars from a Single Image
Imagine creating a lifelike talking avatar with nothing more than a photo and a script—no camera, no filming, no studio setup.
That’s exactly what you can do with Avatar IV, HeyGen’s most advanced photo avatar model. Whether you're animating yourself, a cartoon, or even your pet, Avatar IV brings any still image to life with accurate lip sync, facial motion, and expressive delivery instantly.
What’s covered in this guide:
- What makes Avatar IV different?
- How to create a video with Avatar IV
- Usage limits by subscription type
- Tips for best results
What makes Avatar IV different?
Human-Centric Video Generation: Unlike traditional avatars that simply sync to your words, this new-to-the-world Avatar model actually interprets them. Built on a diffusion-inspired audio-to-expression engine, it analyzes your vocal tone, rhythm, and emotion to generate photorealistic facial movements with true-to-life timing. Think head tilts, natural pauses, subtle cadences, and micro-expressions—all from a single image. The result? A video that feels real, not rendered.
Prompt for Motion + Expression: You can even prompt for specific motion cues (like smile, nod, or look surprised) in your script. And with the Expressive toggle enabled, Avatar IV will boost the intensity of facial gestures and emotional nuance automatically, perfect for high-energy scripts or passionate messages.
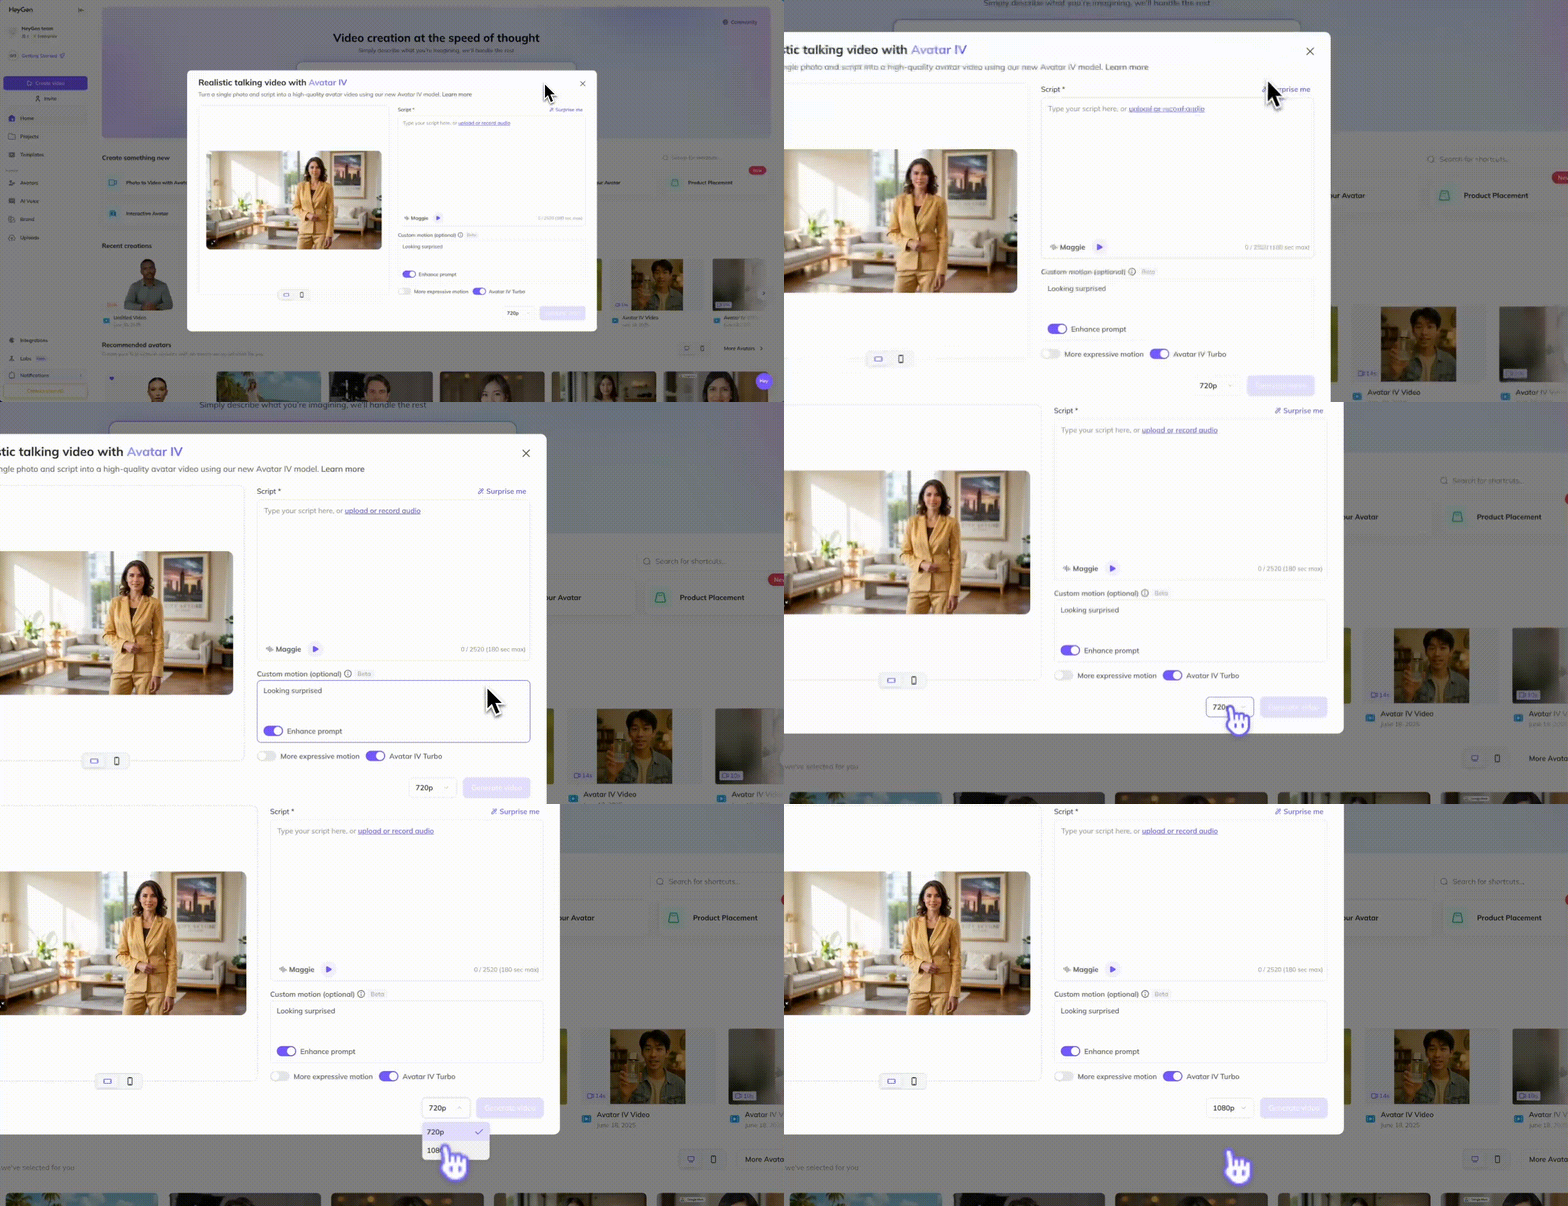
Switch to HD: Want your video in high definition? You can switch the output resolution from 720p to 1080p before generating.
Speed + Simplicity: No complex script writing, scene setup, or editing in the Studio. Just open Avatar IV, fill out the required fields, and your video is ready in seconds. It’s designed for instant, on-the-fly communication.
No Learning Curve: Anyone can use it! No training, no creative brief, no editing timeline.
Think of the Editing Studio as your full production studio—perfect for polished videos. Avatar IV is more like a quick video message: fast, personal, and ready in seconds.
How to create a video with Avatar IV
From your HeyGen homepage, click the 'Photo to Video with Avatar IV' button.

Upload your photo, then either write your script or upload an audio file. If you're using a written script, select your preferred voice.

You can also prompt specific motion by entering cues such as a smile, nod, or look surprised—in the Custom Motion field, check out this guide to learn more about how to prompt motion effectively. Toggle on the Expressive option to enhance facial gestures and emotional intensity.
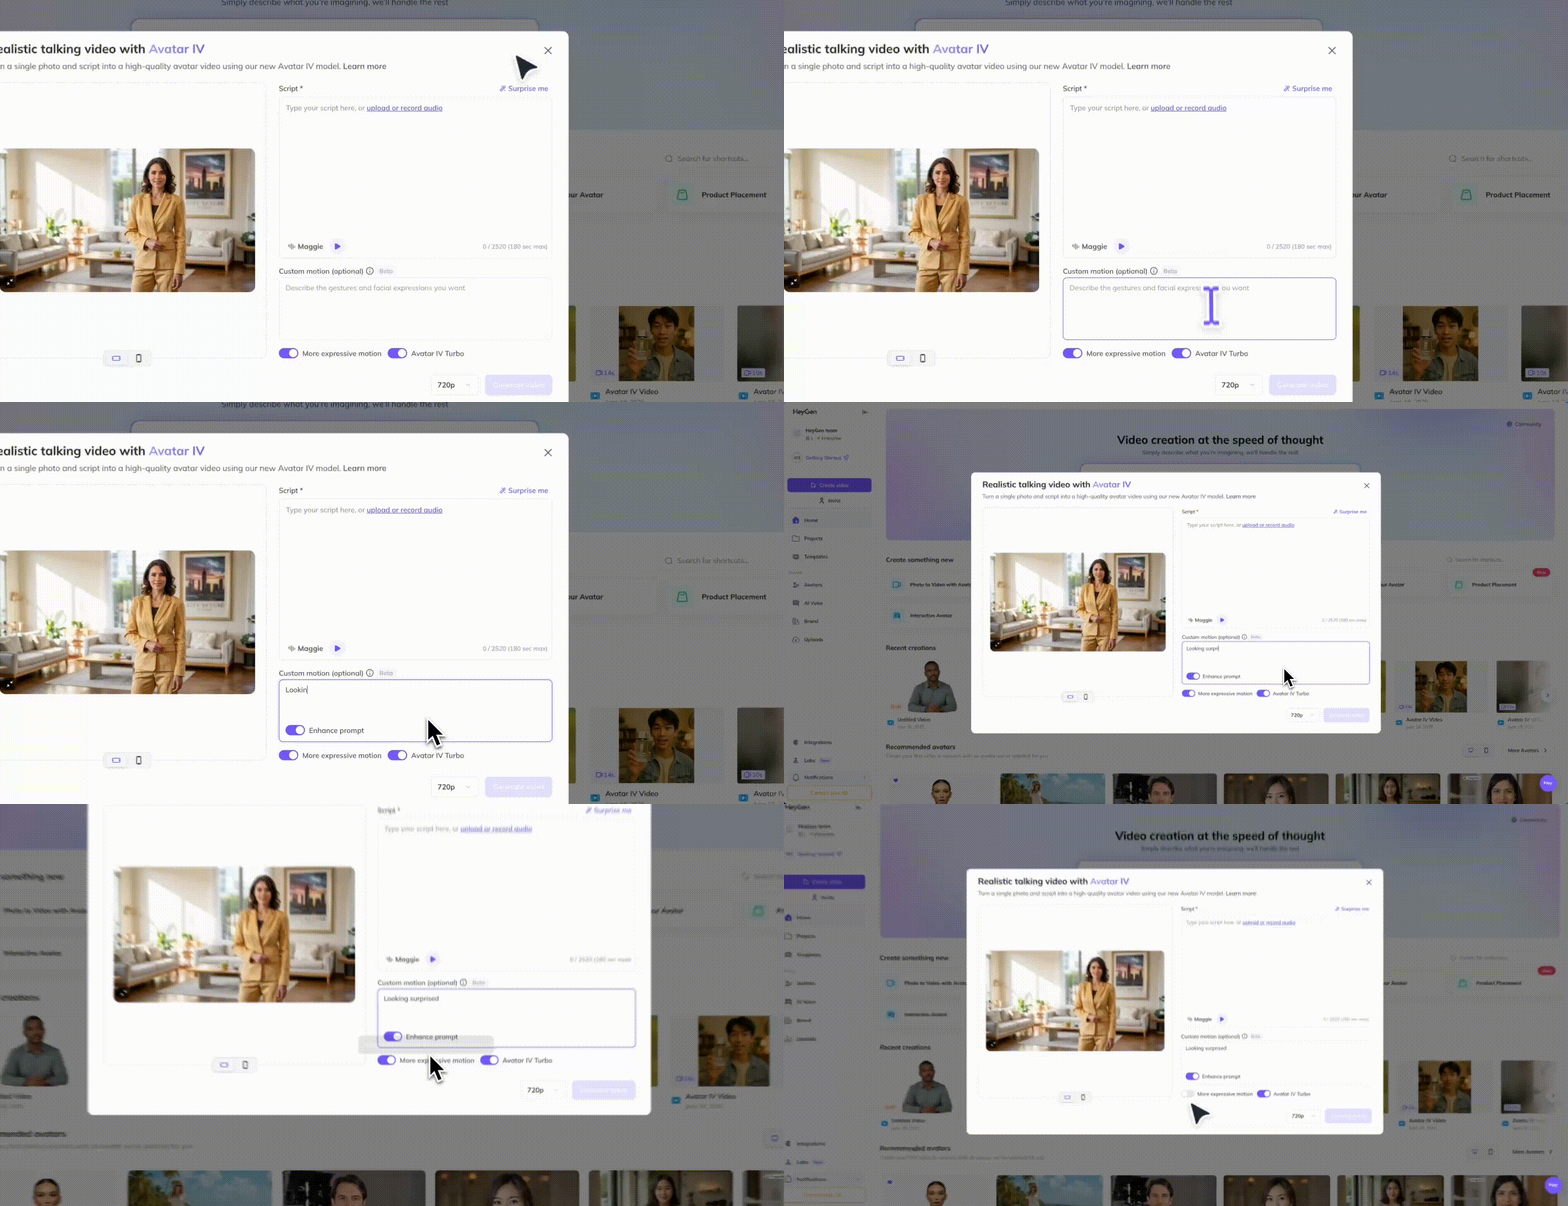
If you need higher quality output, just switch the resolution from 720p to 1080p before generating. Once everything’s set, click Generate to create your video. It really is that simple!
Tip: For best results, use a front-facing image with one clear subject in frame.
Create a video in AI Studio with Avatar IV
You can also add Avatar IV to any video inside the full AI Studio editor, just like other avatars. This lets you combine Avatar IV with scenes, backgrounds, music, and more for a polished production.
To get started, simply open your project in AI Studio, click Add Avatar, and choose Avatar from Image, only your photo avatars are eligible for Avatar IV.
Once you’ve selected your avatar, use the panel above to click Avatar III, then open the dropdown to switch to Avatar IV.
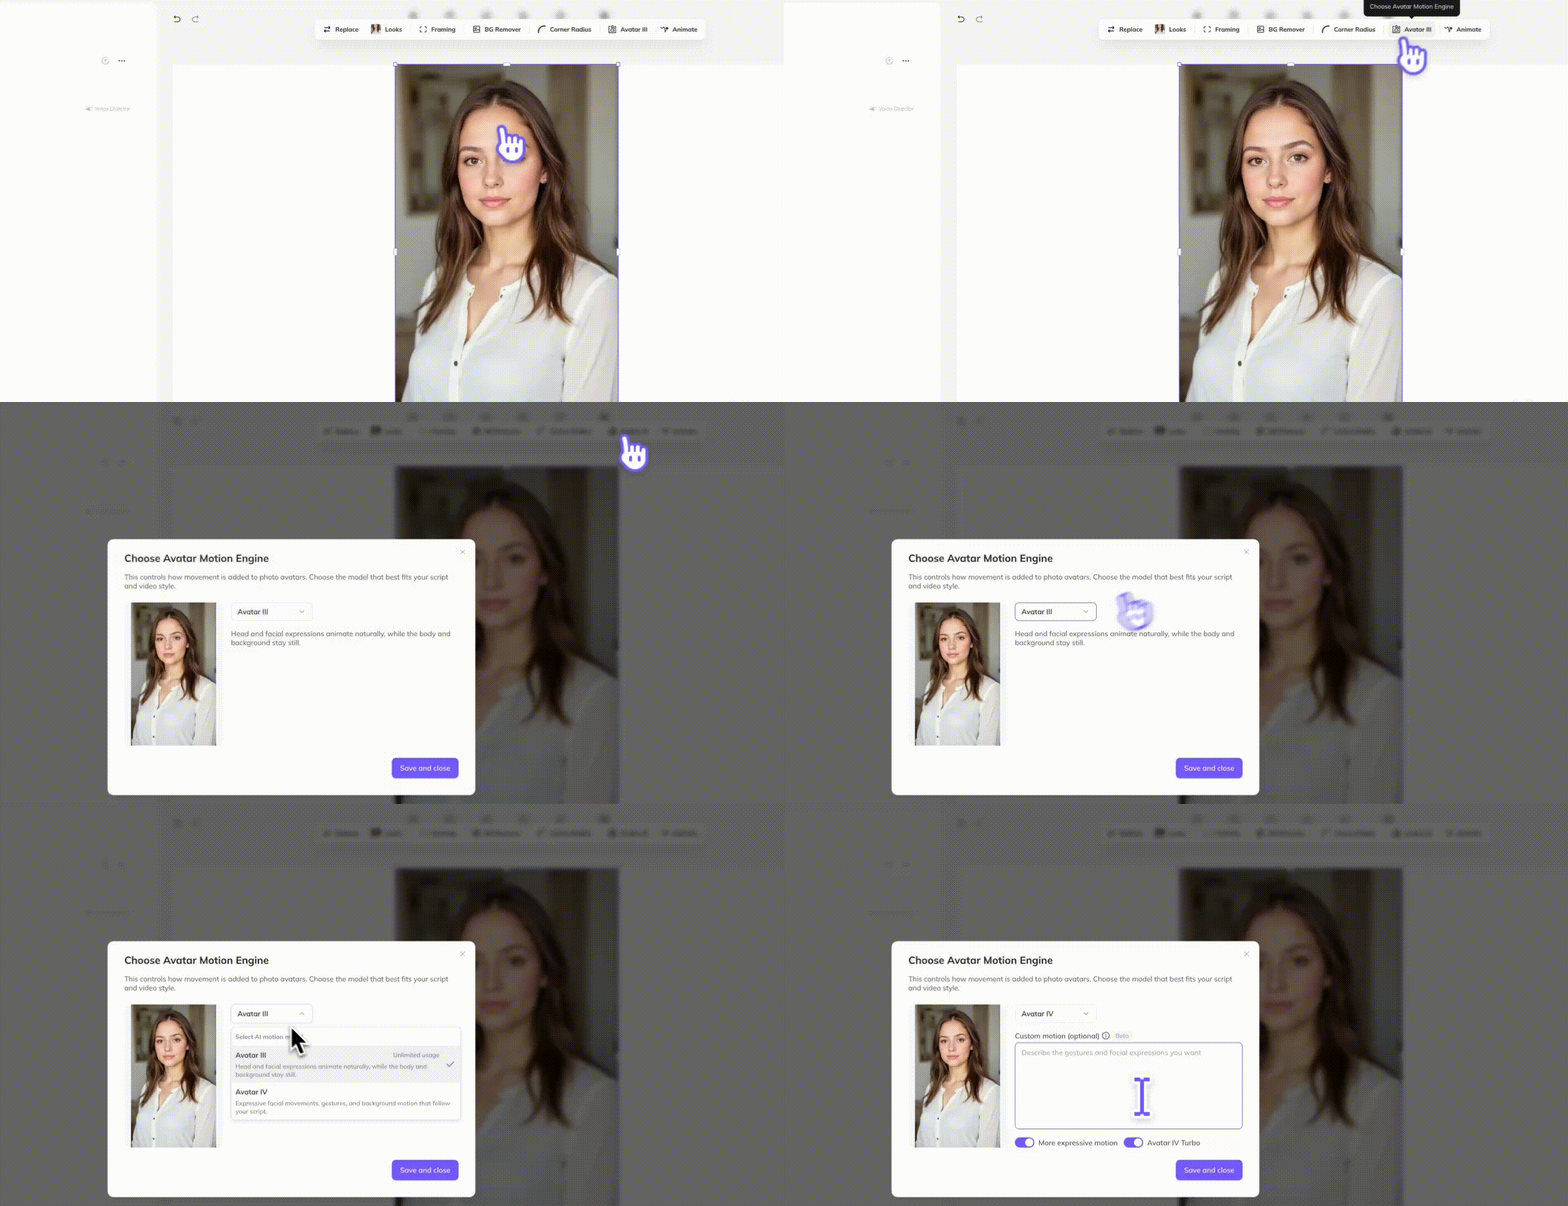
Keep in mind when using Avatar IV in AI Studio some features like background removal, cropping, and certain framing options (such as circle or close-up views) are not supported. Only the standard framing mode is available.
Once you’ve finished setting up your video, click Generate to produce your final output. Please note that generating videos with Avatar IV will use Generative Credits included in your HeyGen plan.
Usage limits by subscription type
Depending on your HeyGen plan, you’ll have monthly access to create a limited number of short videos with Avatar IV. See this Generative Credit Pack article for guidance if you need to purchase additional credits.
Plan Type | Max Video Length | Monthly Limit |
Free | 15 seconds | 3 videos/month total |
Creator | 60 seconds | 5 minutes/month total |
Team | 60 seconds | 5 minutes/month total |
If you run out of Generative Credits for Avatar IV, you’ll be presented with an option to purchase additional credits directly in the app.
Tips for best results
- Stick to one subject per photo. If your image has multiple faces, the model may attempt to lip sync to all of them.
- Use any image type. You can animate pets, illustrations, anime characters, cartoons—anything with a face.
- Pick a photo with a clear, front-facing view. This helps the model track facial structure and create more realistic expressions.
- Use a high-resolution image with a slightly open mouth (not fully closed or wide open)
- Choose a photo expression that matches your intended tone (e.g., avoid “cheese” smiles unless you want high energy)
- Motion is driven by voice. Use expressive audio for better realism. You can upload, record, or mirror audio to match your avatar’s tone
- Custom motion prompting supports gestures, facial expressions, and eye contact
- Keep gesture prompts short to avoid looping or overuse
- Prompts like “sipping coffee” can work even without visible props in the source image
- Results are non-deterministic, meaning identical prompts and audio uploads can lead to different results each generation. Try again if the first output isn’t ideal!
- Use the “More Expressive” toggle for more dynamic movement. Turn off if it feels over-animated
- Enable the Prompt Refinement toggle to interpret simple phrases like “smiling while talking”
Recap
In this tutorial, you learned:
- What makes Avatar IV different?
- How to create a video with Avatar IV
- Usage limits by subscription type
- Tips for best results
We can’t wait to see what you create with Avatar IV! Join the conversation in our forum to share and see what others are creating with Avatar IV!
Comments (9)
Popular

Dive in
Related
Video
Avatar IV Tutorial - Turn Any Photo Into a Talking Video with AI
By Audrey Orkild • May 9th, 2025 • Views 2.1K
Video
Generate Looks Tutorial: Moving Photo Avatars
By Christian Fleischer • Oct 31st, 2024 • Views 1.1K
Video
Avatar IV Tutorial - Turn Any Photo Into a Talking Video with AI
By Audrey Orkild • May 9th, 2025 • Views 2.1K
Video
Generate Looks Tutorial: Moving Photo Avatars
By Christian Fleischer • Oct 31st, 2024 • Views 1.1K